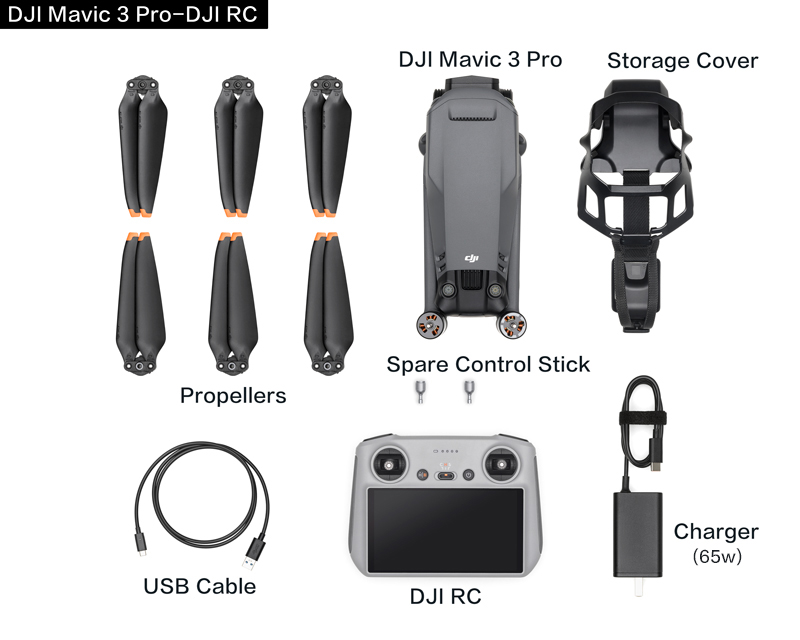
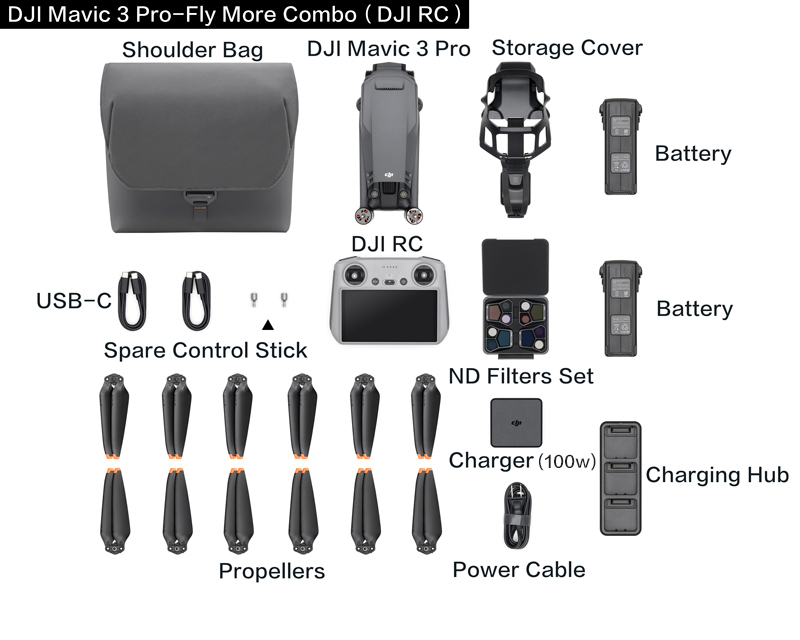
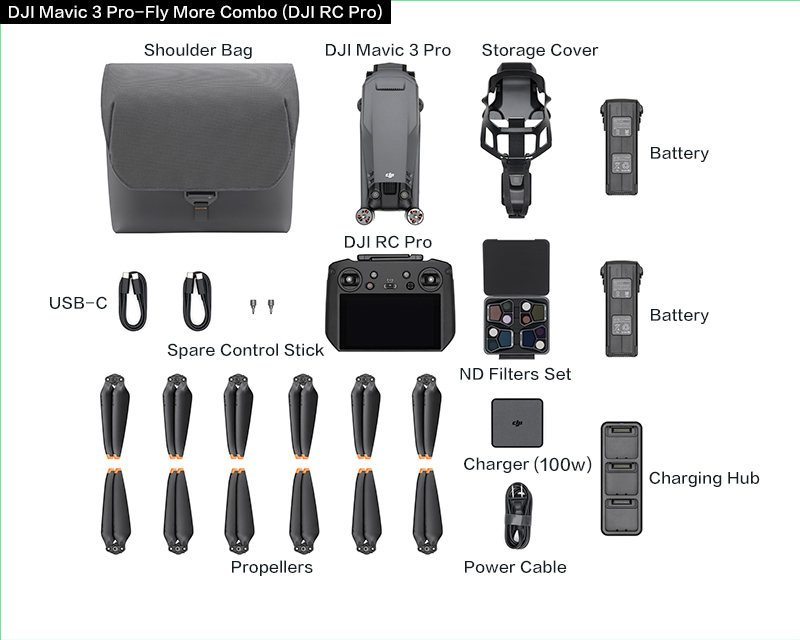
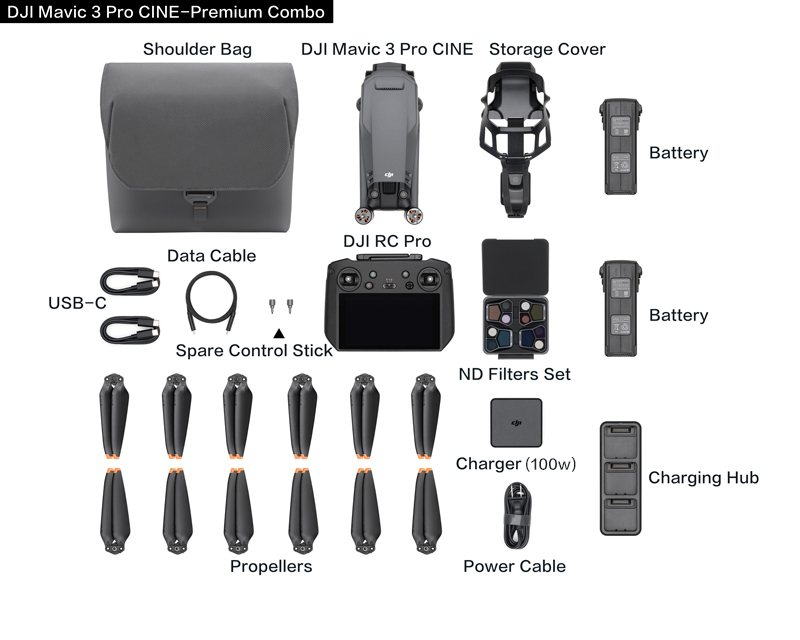
What's In the Box
Charging the Device
How to Get it Charged
It is required to charge and activate the Mavic 3 Pro Intelligent Flight Battery for the first time, and it is recommended to use the charging devices provided by DJI, such as the DJI 100W USB-C Power Adapter and DJI 65W Portable Charger. Please refer to the following instructions to charge the Intelligent Flight Battery and remote controller.
· Charging Intelligent Flight Battery
When the battery level LEDs are on, the battery has been successfully activated.
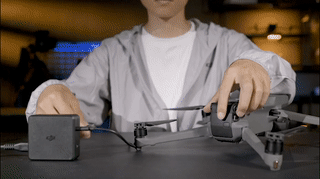
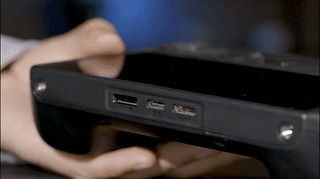
Connecting the aircraft with the battery mounted for charging
Attach the aircraft to the charger using the battery charging cable with the battery powered off.
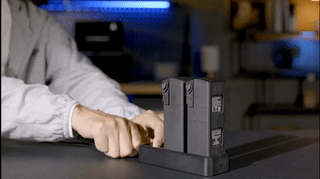
Using the Battery Charging Hub
The Intelligent Flight Battery with the highest power level will be charged first, and then the rest will be charged in sequence according to their power levels.
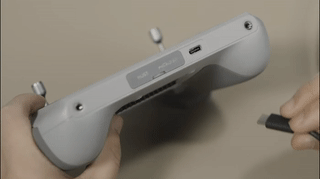
· Charging a Remote Controller
Charging DJI RC Pro
Charging DJI RC
Charging Duration
The battery level LEDs blink in sequence and display the current battery level during charging. The battery is fully charged when all the battery level LEDs are off.
|
|
DJI 100W USB-C Power Adapter |
DJI 65W Portable Charger |
| DJI Mavic 3 Intelligent Flight Battery |
Connecting the aircraft with the battery mounted for charging: 80 minutes Using the Battery Charging Hub (100W): 70 minutes |
Connecting the aircraft or charging hub: Approx. 96 minutes |
| DJI RC Pro |
Approx. 120 minutes |
Approx. 120 minutes |
| DJI RC |
Approx. 120 minutes |
Approx. 120 minutes |
| * Devices will take longer time to charge if both ports are used for charging simultaneously; Tested in a lab environment and should be taken as reference only. |
||
Battery Maintenance
1. Discharge the battery to 40%-65% (the third battery level LED lights up or blinks) if it will not be used for 10 days or more.
2. Charge and discharge the battery about every three months to maintain good conditions of the battery and extend lifetime of the battery. If the battery is stored after completely drained, it may over-discharge and be damaged.
3. Always store batteries in a well-ventilated place.
4. The battery will enter hibernation mode if depleted and stored for an extended period of time. Recharge the battery to bring it out of hibernation.
To learn more about battery maintenance, click: Battery Routine Maintenance Guide
Activating Your Device
For the first-time use, you need to download the DJI Fly app first, and then complete the product activation before use.
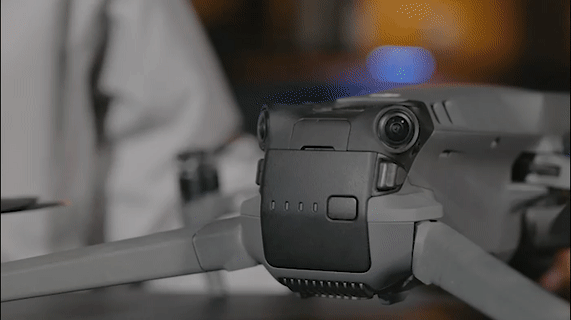
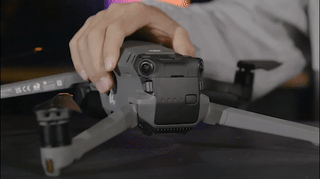
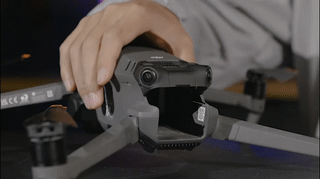
Removing and Attaching the Storage Cover
· Removing the Storage Cover
| Remove the storage cover before activating the drone. If the storage cover is not removed, the motor may be damaged or the service life will be affected, or even impact the flight safety after takeoff. |
Hold the aircraft, pull out the hook at the rear of the storage cover, and detach the storage cover.
· Attaching the Storage Cover
| To safeguard the gimbal and camera as well as aircraft arm, you’d better attach the storage cover when the aircraft is not in use. |
1. Power off the aircraft, and manually adjust the gimbal and camera to face forwards.
2. Hold the aircraft and then insert the hook from bottom to top. Make sure that the hook is securely attached.
Powering on/off the Device
Press the power button on the aircraft or remote controller once, then press again and hold to power on or off the device.
• Aircraft
• Remote Controller
DJI RC Pro
DJI RC
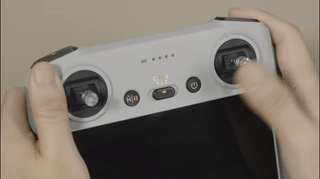
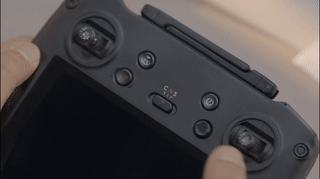
Activating the Remote Controller
Remove the control sticks from the storage slots on the remote controller and activate the remote controller following the on-screen instructions in the app.
Linking the Remote Controller
The remote controller is already linked to the aircraft when purchased together as a combo. Otherwise, follow the steps below to link the remote controller and the aircraft.
Watch this video for the detailed linking steps:
Activating the Aircraft
Make sure that the aircraft is linked with the remote controller successfully. Launch the DJI Fly app, and then complete the activation following the on-screen instructions (An Internet connection is required for activation).
For an overview of how to activate your device, watch the video below:
You can go to the Device Info page for the specific information, such as activation time, warranty period, and service plan.
Basic Use
First Flight
After the aircraft and remote controller are activated, please watch the video to get easy-to-use operations before you head out to fly.
Updating the Firmware
A prompt will appear in the DJI Fly app if a firmware update is available. Follow the on-screen instructions to update the firmware. Note that an internet connection is required.
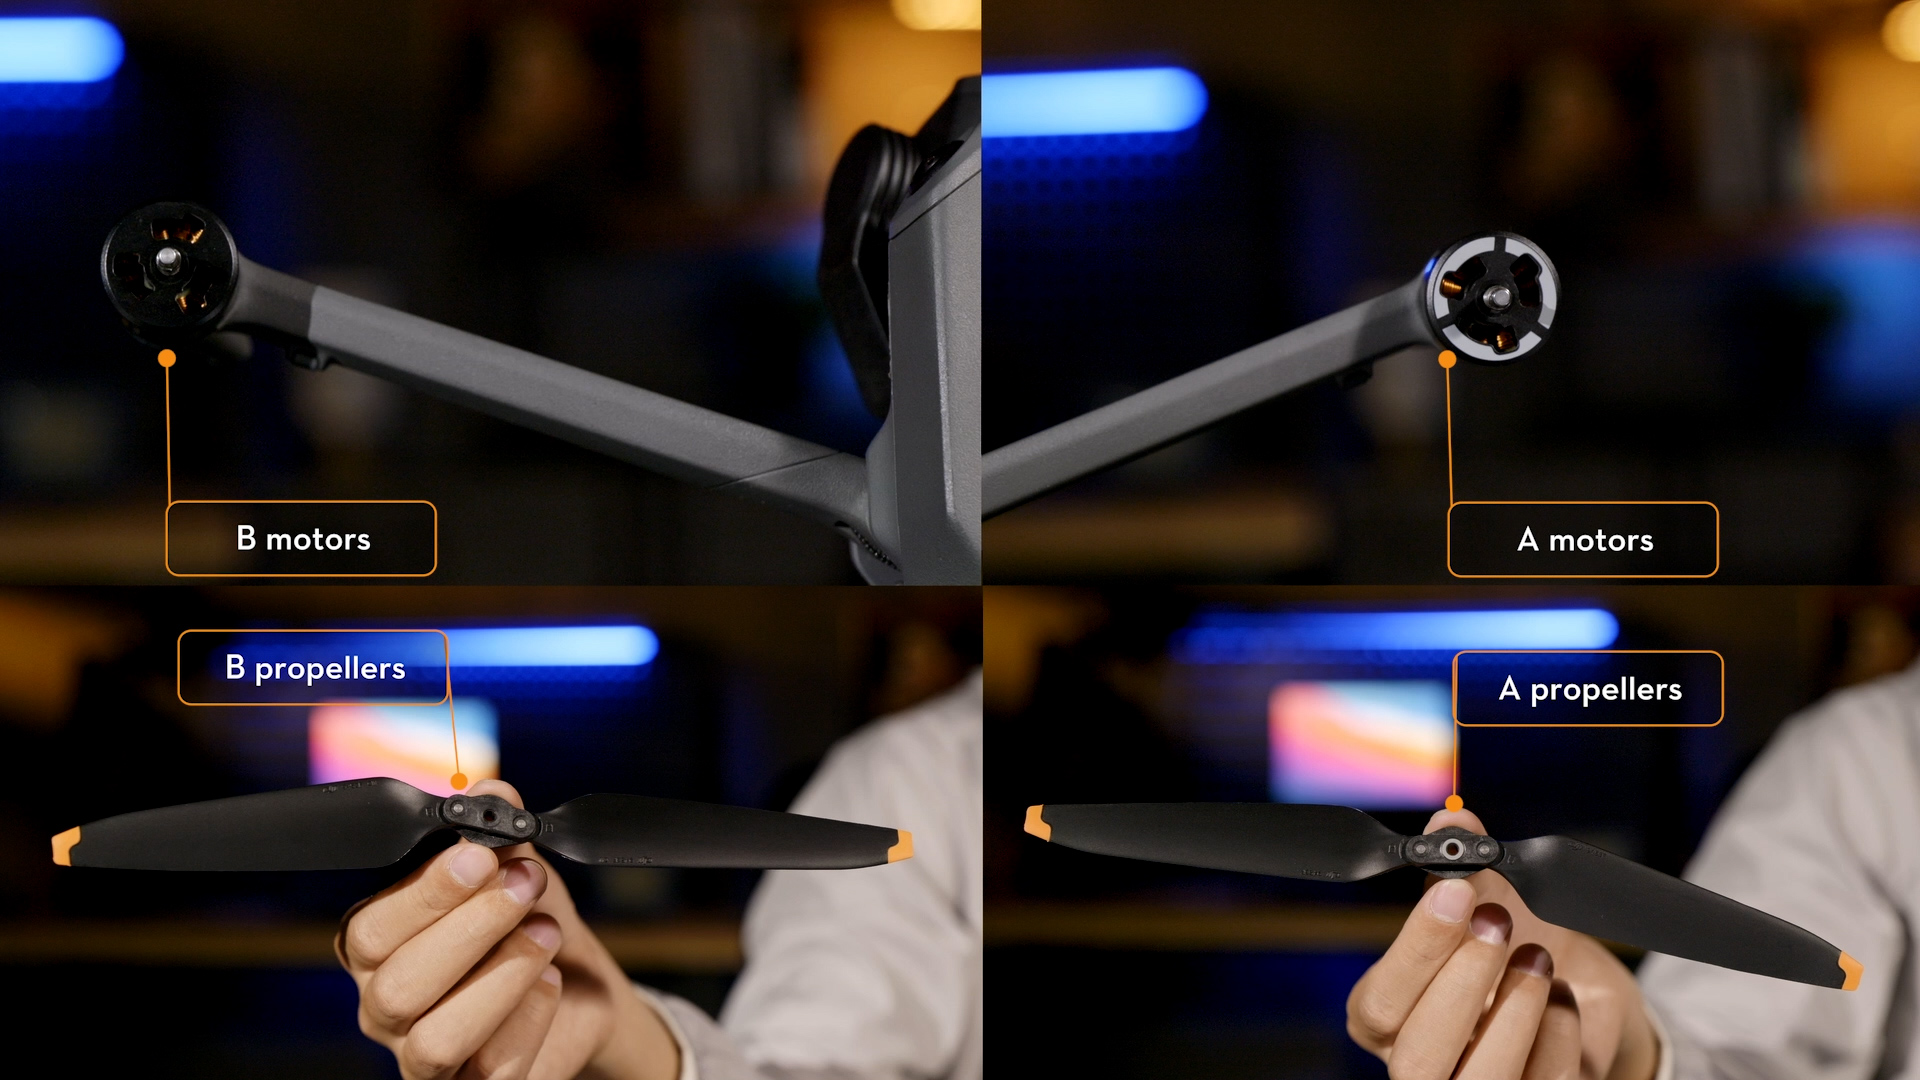
Attaching and Removing the Propellers
As we all know, there are two propeller/motor types: CW and CCW, and marks are used to indicate which propellers should be attached to which motors. Before mounting the propeller, better confirm the mark on each first.
· Distinguishing between Propellers
If the propeller is mounted in an improper way, the drone cannot take off.
· Attaching or Replacing the Propellers
Step 1: Place the drone horizontally and make sure that the drone’s camera faces forwards;
Step 2: Attach the propellers with marks to the motors with marks. Press the propeller down and rotate in the direction marked on the propeller until it locks in place.
Step 3: Attach the unmarked propellers to the motors without marks. Press the propeller down onto the motor and rotate in the direction marked on the propeller until it locks in place.
To learn more about how to attach or replace the propellers, check the video:
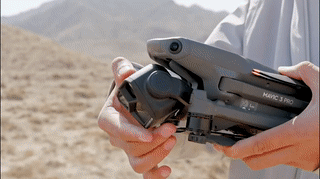
Mounting and Removing the Battery
If you would like to install or remove the battery from the device, please see below:
· Removing the Battery
· Installing the Battery
Intermediate Operations
FocusTrack
FocusTrack includes Spotlight 2.0, Point of Interest 3.0, and ActiveTrack 5.0. This means that you can select a subject and the drone will automatically keep that subject in frame without pushing the control stick.
For an overview of how to use FocusTrack, watch the video below:
MasterShots
When using MasterShots, one of three camera movement series will be automatically selected depending on if the subject is near or far away and whether it is a person. After shooting, Mavic 3 Pro also edits the footage automatically.
Watch this video to learn more about MasterShots:
QuickShots
QuickShots shooting modes include Dronie, Rocket, Circle, Helix, Boomerang, and Asteroid. The aircraft records according to the selected shooting mode and automatically generates a short video. The video can be viewed, edited, or shared to social media from playback.
For an overview of how to use QuickShots, watch the video below:
Hyperlapse
Hyperlapse shooting modes include Free, Circle, Course Lock, and Waypoint.
Watch this video to learn more about Hyperlapse:
Waypoint Flight
The Waypoint Flight function brings automated flight experience. Waypoint Flight enables the aircraft to capture images during a flight according to the waypoint flight route generated by the preset waypoints. Points of Interest (POI) can be linked to the waypoints, and the heading will point toward the POI during flight. A waypoint flight route can be saved and repeated.
Watch the video for a step-by-step guide to use Waypoint Flight:
Night Mode
When the Night mode is enabled, the footage appears to hold onto highlights and capture rich blacks with minimal noise when recording in low-light during a night flight.
For an overview of how to use Night Mode, watch the video below.
Zooming
DJI Mavic 3 Pro is equipped with three cameras, capable of switching freely between different focal lengths to adapt to the shooting composition of various scenes. The Hasselblad camera offers 1x-3x zoom, while 3x-7x zoom is achieved by the medium tele camera and 7x-28x zoom is achieved by the tele camera.
Smart RTH
Tap the RTH icon at the left side of the screen in the app or press the RTH button on the remote controller and hold to initiate RTH.
Watch the tutorial below learn how to use Smart RTH:
Footage Storage and Export
Installing and Removing a Memory Card
If you have purchased a memory card, you can insert it into the black memory card adapter, which can be attached to the TF slot on PC for further file transfer. Please note that the memory card is inserted into the drone without the card adapter.
Please see below for how to install and remove a memory card from the drone:
· Installing a Memory Card

· Removing a Memory Card

Storing Photos and Videos
Photos and videos can be stored to the microSD card on the aircraft, internal storage of the aircraft, or internal storage of the remote controller (microSD card needs to be installed to DJI RC).
Internal storage of the aircraft: Store photos and videos captured by the aircraft.
microSD card on the aircraft: Get more storage and store photos and videos captured by the aircraft.
Internal storage of the remote controller: Store the screen recording files and download photos and videos on the internal storage of the aircraft and microSD card.
|
|
Without microSD Card |
With microSD Card |
| DJI Mavic 3 Pro |
Store photos and videos to internal storage of the aircraft (8GB). |
Store photos and videos to internal storage of the aircraft or microSD card. |
| DJI Mavic 3 Pro Cine |
Store photos and videos to internal storage of the aircraft (1TB). |
Store photos and videos to internal storage of the aircraft or microSD card. |
| DJI RC Pro |
Store photos and videos to internal storage of the remote controller (32GB). |
Store photos and videos to internal storage of the remote controller or microSD card. |
| DJI RC |
Photos and videos cannot be stored. |
Store photos and videos to the microSD card. |
| 1. DJI Mavic 3 Pro supports QuickTransfer, which allows quick drone footage downloads directly to your mobile device. If you do not have demands for screen recording, it is unnecessary to insert a microSD card to the remote controller. 2. Click Here to know more recommended Mavic 3 Pro microSD cards; click Here to know more recommended microSD cards for DJI RC Pro; click Here to know more recommended microSD cards for DJI RC. |
||
Exporting the Photos and Videos
The raw footage captured by DJI Mavic 3 Pro is stored in the internal storage of the aircraft or microSD card. Refer to Aircraft Photo or Video Files Export Guide to know how to use QuickTransfer or other methods for footage exporting.
Tips for Flight Safety
We've rounded up some coping tips for flight safety and we'd like to share them with you, including local laws and regulations (flight limit and drone transportation requirements), pre-flight checklist, and environmental considerations.
Regulations and Policies
As laws and regulations regarding drones can vary widely depending on location. please check local policies and regulations before flying: Checking Local Regulations & GEO Zones
To help users fly more responsibly, we’re offering this exclusive guide highlighting the drone laws and battery transportation policies of over 20 popular destinations around the globe. Click Here.
Safety Precautions
Environmental Consideration
1. Always fly in open areas and keep your drone within line of sight. For safety reasons, you should never fly above people, animals, or moving vehicles: Flight Safety Guidelines
2. Minimize interference by avoiding areas with tall and dense buildings. The performance of the aircraft is limited when flying at high altitudes. The maximum flight altitude of the aircraft is 500 m (for Special Altitude Zones, flight altitude limited to 1000 m). For details about maximum flight distance, refer to the official specifications. Beginner pilots should not be able to fly very far.
Click Altitude and Distance Limit to know more.
Device Checklist
1. Make sure that the propellers are mounted properly, and check if the propellers are broken or bent.
2. Remove the storage cover before powering on the drone and make sure that the battery is mounted in place (a click can be heard).
3. After the device is powered on and connected, check if there are any warnings shown in the app. If yes, follow on-screen instructions and fly the drone after no warnings are detected.
Note that the vision systems cannot work properly in any of the following situations:
1) Flying over extremely dark surfaces, water or transparent surfaces, monochrome surfaces, or surfaces without clear patterns or texture;
2) Flying over obstacles with small surface areas (e.g., tree branches).
Available Accessories
With its great accessories, DJI Mavic 3 Pro helps you put the icing on the cake. To know more about the compatibility of accessories for Mavic 3 Pro, please click Aircraft Accessory Compatibility. For more information about accessories, please go to DJI Store.
DJI Care Service Plan
DJI Care Refresh is a comprehensive and reliable protection plan that provides DJI products with coverage for a range of accidental damages such as collision, water damage, flyaway, and natural wear.
This part walks you through details of DJI Care Refresh, including the applicable scenarios, purchase conditions, benefit descriptions, and purchase channels.
· Click to know more if you have not yet purchased a service plan: Purchasing DJI Care Refresh Service Plans
Consult the content below for a step-by-step guide to activating, binding, and using your service plan, as well as the replacement fees.
· Click to know more if you have already purchased a service plan: DJI Care Service Plan User Guide
You can also find more entertaining and useful flight tutorials and tips in DJI Academy and User Manual.